Client API Guide
Client
Accessible Fields and Tables
See also: Client API
Reference, Client API
Tutorial
Introduction
Verj.io provides a number of tools to create rich client applications; applications where we can exploit current browsers’ scripting capabilities to provide more immersive and interactive experiences – see Client Javascript and Rich Client Features. The Verj.io Client API is designed to be used with these tools and provides a channel from the browser straight into the server, giving the client browser access to current information from the form’s state on the server. It is a JavaScript library that is available to the browser with every Ebase page.
In this document we will look at various uses of the Client API to see how it can help to create a rich client experience.
The Client API
The Client
API Reference has a detailed description and simple examples on how
to use each function and object in the Client API.
Each function in the API is fulfilling one of three roles:
- Getting information from the server
- Setting information on the server
- Executing functions on the server and receiving the result
1.
Getting
information from the server
The value (and the display value) of each of the current user’s Fields and Tables can be retrieved from the server. Fields and tables are not automatically available to the API and have to be explicitly configured as client accessible. See the Client Accessible Fields and Tables section below.

Figure 1 shows an overview of how the Client API can be used with a Custom Event Handler configured on a Button Control (more precisely, using a jQuery Custom Event Handler configured on the click event of a Button Control) to show the value of a Field. Let’s have a look at this in more detail:
1. The user clicks on a button in their browser.
2. A jQuery Custom Event Handler has been set up for the click event of the Button Control using its Html Element Properties Assistant – this contains the following code: alert($eb.getField(“NAME”).displayValue); This code will be now be executed.
3. The getField function in the Client API is called with the field name as a parameter.
4. The Client API remotely calls Verj.io running on the Server requesting the current value of the Field called NAME.
5. Verj.io looks in the user’s current form for the NAME Field and returns its value back to the Client API.
6. The Client API wraps up this response into a $eb.Field object – the Client API’s representation of a Field - and returns it to the calling code in the Custom Event Handler. The Client API’s Field object contains both the fetched Field’s value and its display value. We then use the display value in the alert statement to show the contents of this field.
The example above shows a Field being fetched from the server, but the process is very similar for retrieving the contents of a Table. Instead of wrapping the results up in a Field object before being returned to the calling function as we saw in step 6, it is wrapped up in a $eb.Table object. This object has methods for iterating through its rows and for obtaining the values of one or more of its columns on each row. Multiple Fields and multiple Tables can also be retrieved in one call to the Client API – see the Client API Reference for more details.
2.
Setting information on the server
The Client API also has functions that can set the value of a Field on the server (but not a Table). Setting a Field is accomplished by calling one of the set functions in a similar manner to the get functions above. See the Client API Reference for more details on the different set functions. Fields are not automatically available to the API, and have to be explicitly configured as client accessible – see Client Accessible Fields and Tables below.
Sometimes we want to refresh the page displayed to the user after setting field values from the client. This is achieved by setting the autorefresh parameter to true on the calls to the Client API. Now, the Client API will perform an Incremental Page Refresh (updates only those parts of the page that have changed) after the field has been successfully set on the server. This refresh uses the same technique as when a Form is set to use Ajax to communicate with the server and it is strongly recommended that this type of communication is enabled on a form when using the autorefresh feature.
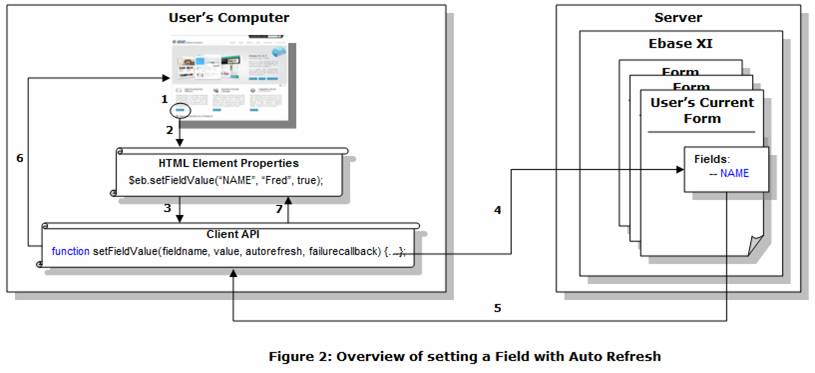
Figure 2 shows an overview of how the Client API can be used via a Custom Event Handler to set the value of a Field on the screen when a button is pressed. Let’s have a look at this in more detail:
1. The user clicks on a button in their browser.
2. The jQuery Custom Event Handler for the button’s click event is called - this has been set up on the Button Control using the Html Element Properties Assistant.
3. The setFieldValue function in the Client API is called with the values “NAME”, “Fred” and true for the parameters fieldname, value and autorefresh respectively.
4. The Client API remotely calls Verj.io running on the Server requesting that the Field called NAME is set to “Fred”.
5. Verj.io looks up the current Field in the user’s current form and sets it to “Fred”. It then returns a boolean to the client containing the status of the set operation.
6. The Client API performs an Incremental Page Refresh using information about the changed page elements received from the server.
7. The Client API then reports back to the calling code in the Custom Event Handler informing it of the successful setting of the Field.
When setting a Field with the Client API, you are doing so directly; Verj.io does not perform any validation on the data other than to check it is compatible with the type of field being set. The full API specification lists all the valid types of data for each Field type, but note that the Client API itself does not know what type of field is being set, it is Verj.io on the server that performs this check. Only the fields explicitly being set are updated, other fields on the page that might have been changed by the user are not sent to the server.
This is the most powerful capability of the Client API. The Client API will call a named JavaScript function within Verj.io on the server. This target function runs in the context of the user’s current form and can use the Verj.io server-side API, which means it has full access to all Verj.io server-side functionality including the form itself, pages, controls, tables, fields, resources, lists. See the Server-side JavaScript Guide for more details as to what is possible.
These functions can also return data back to the client. It is important to note that there are some restrictions on what can be passed back to the client: simple Javascript variables and arrays (var arr1 = [];) and objects (var obj1 = {};) are fine and present no problem. However, functions or methods of Javascript or Java classes cannot be passed and will be simply removed (this applies to things like the JavaScript Date object as well as Verj.io server-side objects like Table or Field, and any classes you may have created yourself). In practice, this becomes a concern when you want to pass complicated data constructs between the client and the server; it is frequently easier to pass the information using a combination of Javascript arrays and objects as opposed to using bespoke classes. See the Client Callable Functions section below for more information.
The Client API can execute a function synchronously or asynchronously and separate methods are provided for each. When using the synchronous method the Client API will wait until the server returns the result of the executed function before returning to the calling code with the result. While it is waiting for the response, the web page will become unresponsive to user interaction. Alternatively when executing the function asynchronously, the Client API will return instantly and then wait for the result from the server; during this time the web page is responsive to user interactions. When the result finally arrives from the server, the Client API will call the specified callback function passing the data returned from the server. Only one Client API call can be made at a time: if another call is made while one is being executed, the second call is ignored. The only time this is an issue is when executing a function asynchronously as all other uses of the Client API are synchronous.
The power of executing a function directly on the server means that the whole form and any of its elements can be manipulated which can change the page currently presented to the user, or could even switch to a different page or form. Verj.io will automatically update the user’s browser with these page changes when the autorefresh parameter is set to true, by performing an Incremental Page Refresh after the server has returned the result of the executed function. This refresh uses the same technique as when a Form is set to use Ajax to communicate with the server and it is strongly recommended that this type of communication is enabled on a form when using the autorefresh feature.
When execution of a function is initiated from a jQuery event from a control e.g. the click event of a button or hyperlink, the context on the server is set before the function is executed. This includes:
· Setting the current table row when the control is inside a Table Control or a Repeater Control
· Setting the event owner to be the control

Figure 3 shows an overview of how the Client API can be used via a Custom Event Handler to execute a Client Callable Function on the server when a button is pressed. Let’s have a look at this in more detail:
1. The user clicks on a button in their browser.
2. The jQuery Custom Event Handler for the button’s click event is called - this has been set up on the Button Control using the Html Element Properties Assistant. The first thing this Handler does is define a function called success that pops up a given parameter in an alert box.
3. The Handler then goes on to call the executeFunctionAsynchronously function in the Client API with parameters including:
· the success function just defined
· a null failure callback function
· the name of the function to execute on the server
· the data to pass into the function (in this case an array with two numbers: 2 and 3)
· and a boolean true to request the autorefresh feature
4. The Client API immediately returns back to the calling method. As there is no more code in the Custom Event Handler, control is now passed back to the browser and the user may continue interacting with the page.
5. Meanwhile, the Client API remotely calls Verj.io running on the Server requesting the execution of the add Client Callable Function passing the given array as a parameter. As the autorefresh feature is requested, the Client API also tells Verj.io that it wants to be informed of all changes resulting from the execution of the function – so that the user’s page can be refreshed.
6. The add function is executed on the server and the result of the addition (2 plus 3) is set in the total variable.
7. The Client Callable Function returns this total variable and Verj.io passes this back to the Client API together with details on what has changed on the page.
8. The Client API performs an Incremental Page Refresh using the information about the changed page elements received from the server.
9. The Client API then calls the given callback function (success) which displays the number 5 into an alert box (the total returned from the Client Callable Function).
Caution should be exercised when using autorefresh together with an asynchronously executed function. As we just saw, the user is free to interact with the page while the function is executing on the server. Depending on the connection speed and the work the function has to do, it could be a little while before the result is returned to the Client API. The first thing the Client API does upon receiving the response from the server is perform an incremental page refresh and this might overwrite any changes the user has made to the page in the meantime.
It is also possible to request a full submit of input fields when using the Client API to execute a function (either asynchronously or synchronously). This instructs the Client API to transmit all input data to the server in the same way as for normal posting of the form (e.g. clicking a button). Verj.io will perform server-side validation on these inputs and set their corresponding fields accordingly before executing the requested function. Should the validation fail, the function will not be run and the failure message will be returned to the Client API. When performing a full submit, it is strongly recommended that the autorefresh feature is also used – that way if validation fails, the user will see any validation messages.
In the examples above, the Client API is called using the built-in $eb alias. This is an alias to com.ebasetech.clientapi and is designed to provide a more concise and readable way of interacting with the API. The longer version could also be used, for example com.ebasetech.clientapi.getField(“NAME”) instead of $eb.getField(“NAME”).
Client Accessible Fields and Tables
Every Field and Table in the form has a Client Accessibility property which determines what the Client API can do with that Field or Table.
Each Field can have one of three client accessibility states:
- Inaccessible (default) – the Client API cannot retrieve or set this Field.
- Read Only – the Client API can retrieve but not set this Field.
- Read/Write – the Client API can retrieve and set this Field.
See Field Properties for details about where the Client Accessibility Property is set.
Each table can have one of two client accessibility states:
- Inaccessible (default) – the Client API cannot retrieve or set this Table.
- Read Only – the Client API can retrieve but not set this Table.
See Table Properties for details about where the Client Accessibility Property is set.
This is designed as a security measure. As some fields and tables could contain sensitive information (such as passwords) it is not best practice to expose them to direct access to the outside world as it’s possible that the user’s browser session could become compromised by a third party. By exposing only those fields and tables that are available to the Client API this risk is minimised.
The accessibility states of Fields and Tables do not affect Client Callable Functions – these are able to read and update any Field and Table in the form regardless of the current state of this property.
Client Callable Functions
These are the functions that the Client API can execute. One or more scripts containing functions can be added to a form via the Events Tab on the Form Properties Dialog. The order of the scripts in this dialog is important: if two different scripts contain the same function name then the function in the script lower down the order will overwrite the first function, and similarly if one script contains two or more functions with the same name then the function that occurs last in the script will overwrite the others.
Every function within one of these scripts is available to the Client API for execution. If the Client API attempts to execute a function not defined in one of these scripts, the server will report an error back to the Client API which will then pass that error back to the calling code via the failure call back function if one was supplied.
The functions themselves are just regular JavaScript functions that can accept one parameter (note that it is not possible to create FPL Client Callable Functions scripts). These functions should be declared using the following syntax:
function name( parameterName )
{
// your code here.
}
name and parameterName can be any JavaScript permissible name of your choosing.
Every function defined in a Client Callable Function script is accessible to the Client API, but only one of these functions can be called at any one time. Each Client Callable Function can call other functions in the same script, another Client Callable Function script or any of the (JavaScript) Shared Functions. Although Client Callable Functions can call Shared Functions, Shared Functions cannot be called directly from the Client API so potentially sensitive, or useful utility methods can be used without exposing them to the outside world.
One parameter can be passed to a Client Callable Function, although this parameter could be an array or object holding multiple values. These basic JavaScript arrays and objects are transferred from the client to the server unaltered, but other objects (for example Dates and Fields) will only have their member data available and any methods/functions on them will be lost. JavaScript objects and values can be returned from a Client Callable Function back to the Client API. These returned values/objects/arrays follow the same rules as the input parameter: basic JavaScript objects and arrays are passed back unaltered, but other types of objects (e.g. Dates and Fields) will be stripped down their member data.
It is possible to add code to Client Callable Function scripts which is not enclosed in a function statement. Although this code is not directly callable from the Client API, it will be executed whenever any Client Callable Function is executed and is run in the global scope before the function is executed. Generally however, this should be avoided as it increases complexity, making the scripts harder to debug and reuse in other forms.
Next Steps
Here there is a step-by-step example of creating Client Callable Functions and calling them from the Client API.