Understanding Server-side
Events and Validation Principles
User
Action Events: On Click, On Change etc.
Adding
and removing scripts from events
Displaying
all events for a form or component
An event represents a point during execution of a form or integration service where programming can be executed. Each event can be associated with any number of scripts and this is the primary mechanism used to provide the developer full control over form behaviour.
Here is a complete list of events supported by the system and some typical uses for each event type.
Form Events
Before Form Event
|
When executed: |
This event runs only once at the start of form execution. |
|
Typical uses: |
To perform any preliminary processing before the first page is displayed to the user e.g. load information from a database or some other external system. |
|
Considerations: |
There is no current page when this event runs, so any commands such as HIDE, SHOW etc which effect how a control is displayed must include the ON PAGE syntax; error and warning messages cannot be issued. |
After Form Event
|
When executed: |
This event runs when the user clicks the form’s finish button. All pages of the form will normally have been fully validated at this point. After this event completes, form execution is terminated and the form's final page is displayed. See Page Sequencing for more information on the finish button and final page. |
|
Typical uses: |
To perform any final processing: this might include inserting database records, sending emails, preparing messages to be displayed on the form's final page etc. |
|
Considerations: |
It is not possible to continue execution of the form after this event so, for example, commands such as GOTO PAGE cannot be issued. The form’s final page is the only page that can be displayed after execution of this event. Execution of this event is linked to the use of a finish button. It should be noted that a form is not required to have a finish button, and there are many cases where it is more practical to perform any such “final” processing as a result of a normal page button e.g. button with text “Submit”. |
On Error Event
|
When executed: |
Whenever an error occurs while executing a form. If this event is not specified, the form will terminate and the standard form failure error page is displayed. |
|
Typical uses: |
To allow a form to “fail gracefully”; to route control to an error display page; to continue form execution.
|
|
Considerations: |
The following system variables are available in an on error event: $ABORT_MESSAGE – contains the failure reason $ABORT_PAGE – contains the name of the current page at the time of the failure. Note that this will contain null when there is no current page e.g. when a failure occurs during execution of a before or after form event.
Failures that occur during the execution of on error events will result in the display of the standard form failure error page. |
Browser Back Button Event
|
When executed: |
This event runs when the user clicks the browser back button and then clicks on a control (usually a button or hyperlink) from a previous page. See support for browser back button for further details. |
|
Typical uses: |
To reset any application state – flags, field and table contents etc. |
|
Considerations: |
Integration Service Events
See Integration Server for details of events supported by an Integration Service.
Page Events
Before Page Event
|
When executed: |
This event runs before each new page is displayed. It runs prior to displaying the first page of a form, and subsequently each time a user navigates to a page using the next page button or a page is displayed as a result of a GOTO PAGE command. It does not fire when a page is re-displayed or the user returns to an earlier page using the previous page button. |
|
Typical uses: |
To perform any preliminary processing for the page e.g. loading database data, displaying or hiding controls, making controls display only or enterable etc. |
|
Considerations: |
It is possible for a page to have no displayable fields and to skip display of the page; this skip display option is available on the General tab of Form Properties. When this option is selected, the page will not be displayed to the user, however the before and after page and any event field events will still fire in the appropriate sequence. |
After Page Event
|
When executed: |
This event runs when the user has clicked the next page button or the form’s finish button, and all controls on the page have been successfully validated (see control validation event). An exception to this occurs when the after page event has already been executed and issued one or more warning messages; in this circumstance, the next page button is not actioned and the page is re-displayed to the user so the message can be seen. If the user clicks again on the same next page button or the finish button and does not make any other changes on the page, execution of the after page event is bypassed. |
|
Typical uses: |
To perform page level validation or multiple control validation; to set the next page. |
|
Considerations: |
It is possible for a page to have no displayable fields and to skip display of the page; this skip display option is available on the General tab of Form Properties. When this option is selected, the page will not be displayed to the user, however the before and after page and any event field events will still fire in the appropriate sequence. |
Previous Page Event
|
When executed: |
This event runs when the user clicks the previous page button to return to the previous page. |
|
Typical uses: |
To validate specific controls – control validation events are not automatically executed when the user clicks the previous page button. |
|
Considerations: |
Warning messages should not be issued from this event. A warning message will not stop the re-display of the previous page; the message is only then displayed when the user navigates back to the original page. |
Control Events
Before Control Event
These events are only available for the following controls: Field Control, Table Control, Table Column Control
|
When executed: |
This event runs when the page containing the control is displayed for the first time i.e. the event will only be fired once for each control. The event does not fire when a page is re-displayed - either paging forwards or backwards. Before control events are run immediately after the before page event, and are processed in the sequence that the controls appear on the page. When the control is nested inside a Repeater Control, the event will be executed once for each row in the table associated with the Repeater Control. The event will be executed for all table rows, not just those that are visible – this is true even when a table filter has been specified for the Repeater Control. |
|
Typical uses: |
To set an initial value for a field or table column, load a table etc. |
|
Considerations: |
Please note that before control event processing is different for event fields. |
Validation Event
These events are only available for the following controls: Field Control, Table Column Control. They are intended to be used to validate input data entered by the user.
|
When executed: |
This event runs whenever a field or table column has a value that has not yet been validated – this applies only when the field/column is enterable (i.e. not display only). A field/column is considered to be validated when any configured system validataors and the field’s validation event run successfully i.e. the event does not end by issuing an error message. Any subsequent change to the field/column value will result in the field/column being revalidated – this includes all possible ways in which a value might be set i.e. entered by the user, read from an external resource, set from a script, set from a dynamic list etc. Validation events are processed in the sequence that the controls appear on the page. This process continues until either all controls on the page have been validated, a script issues an error message, or a control is reached where the user has clicked some type of immediate event: e.g. a button, hyperlink, image etc. For table columns, validation events run only for rows within the currently visible vertical set; however, validation events are run for all controls within the current horizontal set even though a column might only be visible to the user by scrolling horizontally. See table concepts for further details. |
|
Typical uses: |
To perform validation of input data entered by the user. |
|
Considerations: |
The execution of validation events for each control is based on the status of that control as displayed to the user. If the status of a control is subsequently changed by a script e.g. a control is made display only, this does not affect whether or not a validation event for that control is executed. Please note that validation event processing is different for event fields. |
User Action Events: On Click, On Change etc
|
When executed: |
These events run as a result of some sort of user action, usually clicking something e.g. a button, link, image etc. An On Change event occurs when the user changes the value of a field or table column that has the immediate validation option set. |
|
Typical uses: |
To perform some sort of explicit task e.g. display detailed information, go to another page, insert a row in a table, hide or show subsequent controls etc. |
|
Considerations: |
Any validation events for controls higher on the same page are run prior to executing an On Click or On Change event. The Verj.io Studio allows configuration of On Click events for all Field Controls and Table Column Controls. This is to support the possibility that the control is dynamically changed to become a hyperlink using the SET CONTROLNAME HYPERLINK command. On Change events should not be used to perform validation where error messages are issued to the user – use the validation event instead. The reason for this is that this event is only fired when the user changes the value of a field. It is not executed in any other circumstances e.g. when the user clicks the next page button. This issue is illustrated by the following example: An order form contains a
checkbox “Express Delivery” which is only valid when the order destination
country is “US”. This is checked by a script on the onchange event of the immediate
validation field EXPRESS_DELIVERY. The user clicks the checkbox with a
destination country of “ The solution to this problem is to move the validation scripts from the onchange event to the validation event. |
Table Control Events
See also table concepts.
Before Table Event
After Table Event
|
When executed: |
This event runs after all table column validation events have been processed and after any table internal events such as sorting or scrolling have been processed. |
|
Typical uses: |
Can be used for any processing that needs to be performed against the table as a whole. This event is not commonly used. |
Add Row Event
|
When executed: |
This event runs when the user clicks the add row button of a table. |
|
Typical uses: |
To initialize values for the new row. |
Event fields
Verj.io supports two types of field: display fields
(the default – these are “normal” fields), and event fields. Event table columns are also supported
similarly. Event fields/columns have the following characteristics:
·
they are never displayed to the user
·
before control
events are always fired when moving forwards to a page via either
the user clicking on a next page button or a go to page request from a script (either the goto page FPL
command or by invoking the API form.gotoPage()
method) . Events are not fired when a page is re-displayed (e.g. with error
messages) or when the user clicks the previous page button.
·
validation
events are always fired when input is received from a page (so long
as event processing is not interrupted by an event earlier on the page e.g.
issues an error message). “Validation event” is not an accurate description for
these events when applied to event fields – “after input event” would be more
accurate.
The main purpose of event fields is to provide a mechanism whereby a script is always executed at a certain point in the processing regardless of whether input has been received from the user.
Validation of input data entered by the user is performed using a mixture of client side and server side validation, and on the server, a mixture of system supplied validation and additional validation provided by the developer. For each user request, input data is validated up to and including the action point, which is defined as the control or other element clicked or actioned by the user. As each page is submitted by the user, the following processing is performed:
1.
Client
Validation
Client-side system supplied validation processing is only performed when Javascript is enabled. This includes:
· Checking for mandatory fields/table columns
· Checking data entered is appropriate for the field/table column type
· Checking data entered against any system validators configured for client validation
If client validation fails, an error message is issued and the field/table column in error is highlighted.
When client validation is successful the page is submitted to the server.
2.
Server
Validation
Server-side validation is performed in the following sequence:
· The system checks for missing mandatory fields/table columns and input data that does not match each field/table column type.
· Then any system validators configured for server validation are run for all fields/table columns on the page.
·
All fields/table columns requiring validation
are then validated in the sequence that they appear on the page by:
o
checking entered data against a list (this only
occurs if a list is configured and the field/table column is displayed as a
text input field)
o executing any validation scripts.
An error message issued at any point
in the above processing causes processing to stop immediately and the page is
re-displayed to the user.
3.
Execution
of the user request
This is usually associated with an event to perform explicit application
processing.
Adding and removing scripts from events
As each event occurs, the system will run all the scripts associated with the event in the order that they have been specified (so long as processing is not interrupted e.g. by issuing an error message or a GOTO command).
Associating a script with an event or removing a script from an event is done using the Events Dialog shown below – for form level events, this is displayed by clicking the Events tab of Form Properties; for page level events, by double clicking on one of the Event properties or right clicking on the page and selecting Events; for control level events, by double clicking on one of the Event properties or right clicking on the control and selecting Events.
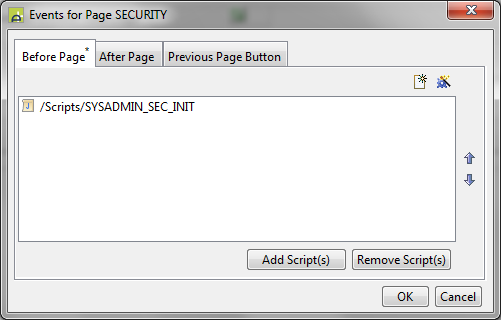
Initially,
the default event for the element is displayed. Other events can be displayed
by clicking on the appropriate tab key. A superscripted * character to the right
of the event name indicates that at least one script is configured for the
event. The sequence of script execution can be altered by selecting a script
and clicking on the ![]() and
and ![]() icons.
icons.
Scripts can
be added and removed by clicking on the Add Script(s) and Remove
Script(s) buttons. The Add Script(s) button will present the Workspace Browser containing a list
of all available scripts in the current project or any linked projects.
Clicking
the new icon ![]() allows the creation of a new script. The newly
created script is added to the event automatically and opened for editing.
allows the creation of a new script. The newly
created script is added to the event automatically and opened for editing.
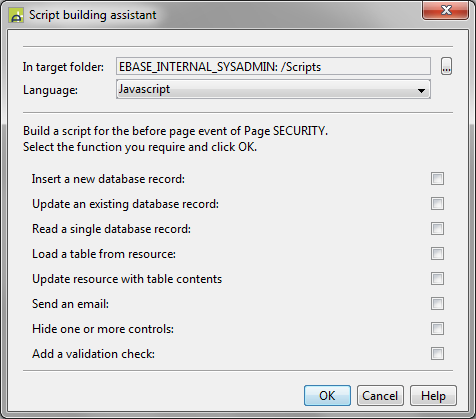
Clicking the wizard icon ![]() presents a dialog that can be used
to automatically create a script for some common functions as shown below:
presents a dialog that can be used
to automatically create a script for some common functions as shown below:
Displaying all events for a form or component
A map of all events for a form or component can be displayed
by selecting View > Show/hide Server
Event Map from the menu at the top of the studio; this switch acts as a
toggle to show or hide the Server Event Map
Panel.